
Introduction
Is your garage or shed overrun with clutter? Power tools, paint cans, gardening supplies, sports gear, random stuff you found at a garage sale, scrap pieces of wood that you will never use but can’t throw away-all fighting for space? One of the easiest and most cost-effective ways to reclaim your garage or shed is by building your own wooden shelves. It’s a project that delivers huge organizational benefits—and you don’t have to be a master carpenter to get it done.
Why Build Your Own Shelves?
If you are like me, then you are not one to hire someone else to do a job you can easily accomplish with the necessary tools on hand. While there are plenty of pre-made shelving units on the market, building your own offers several advantages:
- Customization: You control the dimensions, materials, and layout to fit your needs. Other than the limitations of the space you are working with, the “possibilities” are endless. You can choose the thickness of the material, the paint color, the height of the shelves, etc.
- Strength: DIY shelves can be built stronger than many of the residential-grade shelving units on the market. Most of the budget-friendly options are made of cheap plastic, while the heavy-duty ones made of wood or metal are going to cost you an arm and a leg. By doing it yourself, you can make a sturdy solution while not having to spend a boatload of money.
- Cost-Effectiveness: With basic tools and inexpensive materials, you can build shelves that won’t break the bank. 2x4s, plywood, and screws are relatively cheap compared to buying pre-made shelves.
- Satisfaction: There is something about “doing it yourself” that brings satisfaction, or at least that’s the way I see it.
List of Materials & Tools
Materials Needed:
- 2×4 Lumber (for framing)
- Plywood or OSB 23/32″ (for shelf surfaces)
- Wood Screws – 3″ or 4″ (for fastening framing together)
- Wood Screws – 1-1/2″ or 2″ (for fastening plywood to framing)
- Bolts / Washers / Nuts (optional)
- Primer / Paint (optional)
- Paint Brush or Paint Roller (optional)

Tools Needed:
- Cordless Drill or Impact Driver
- Circular Saw or Handsaw
- Stud Finder
- Level
- Measuring Tape
- Carpenter Square or Rafter Square
- Marker or Carpenter’s Pencil
- Ladder (if applicable, but most likely)
- Miter Saw (optional)
- Chalk Line (optional)
- Framing Nail Gun (optional)
- Orbital Sander (optional)
- Safety Gear (goggles, gloves, ear protection)
- Friend or Volunteer (extra set of hands)

Step 1: Plan Your Shelf Layout
Before you begin cutting any wood, measure the space and sketch out your shelving plan:
- Height: Consider what you’ll be storing. Leave space for tall bins or objects. Look up the average heights of different storage bins so if you purchase different styles, they will fit on your shelves.
- Depth: 16-24 inches is typical. Too deep and it may be difficult to reach items near the back of the shelf; too shallow and storage is limited. Quick tip: most sheets of plywood or OSB have a width of 4 feet, so if you make your shelves wider than 2 feet, then you will likely waste more lumber than if you keep it at 2 feet or smaller.
- Length: Shelves can run the entire length of your wall or be segmented. Customize the length of your shelves to best fit the space you are working with.
Step 2: Locate Studs & Mark The Wall
Use a stud finder to locate the wall studs, and mark them clearly. This is where you will anchor your shelving unit to the wall. I like using two different stud finders: a magnetic stud finder that locates drywall screws, and an electronic stud finder that finds studs and also detects electrical wiring. Be cautious of what is behind the drywall. If there is an outlet on the wall, then keep in mind that wiring is attached to the stud behind it, and/or somewhere nearby. Another issue arises when it comes to plumbing, since most stud finders do not detect PVC plumbing pipes. If you have attic access above your garage, then you may be able to locate any electrical wiring, plumbing, or other obstructions that are in the wall cavity. In many new homes, nail plates or stud protectors are installed at the locations of electrical wires or pipes to prevent them from being punctured by nails or screws. Be that as it may, I would not rely on this as a safeguard. Never trust what you can’t see.
After marking the studs, use a level to draw horizontal lines where each shelf will sit. This will guide your installation.
Step 3: Framing The Shelf
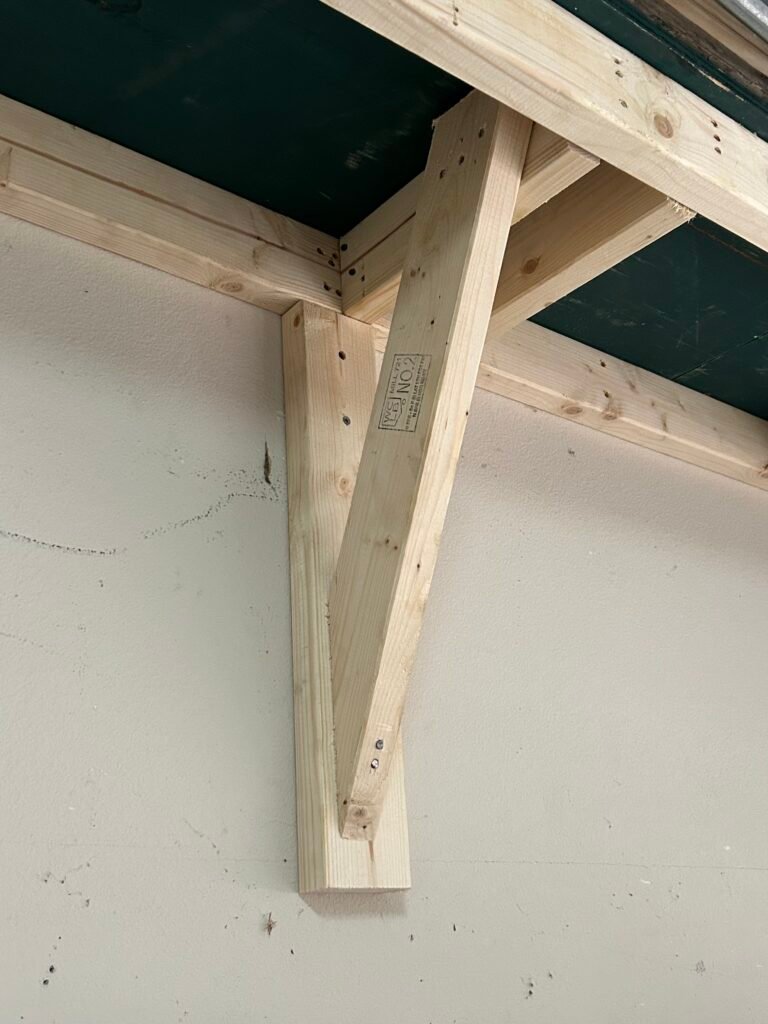
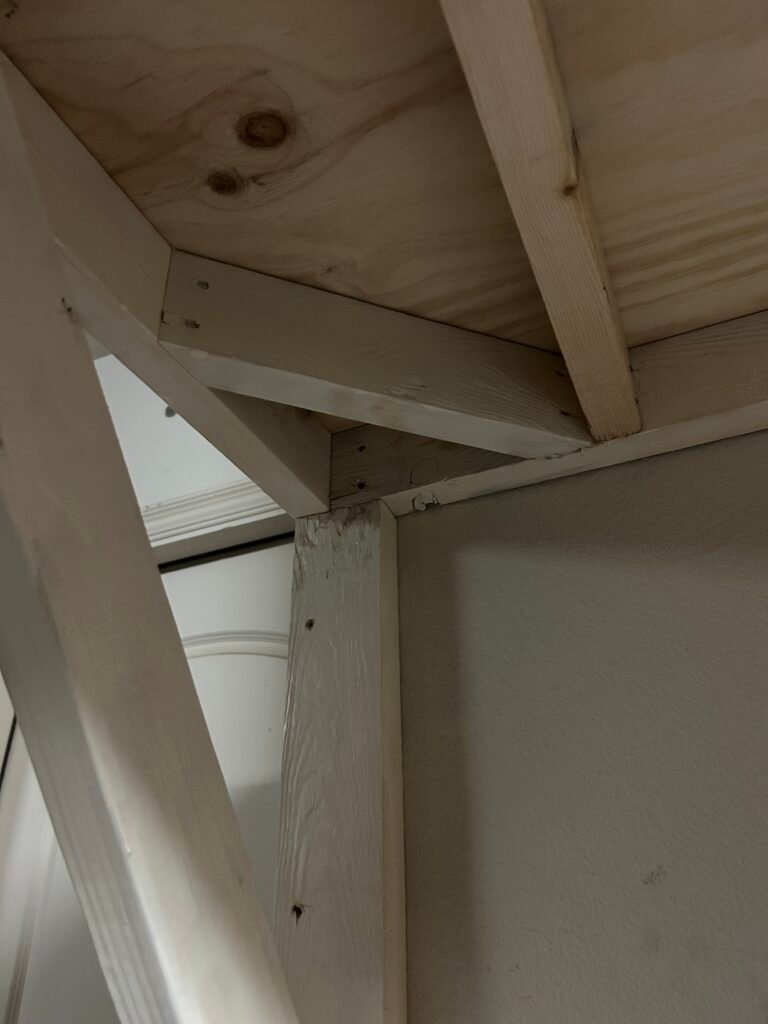
Construct rectangular frames using 2x4s. If you are building “standing” shelves, then you may build the frame of the shelving before you secure it to the wall. This works if the ground you are working with is even. From experience, I prefer attaching the main beams to the wall first and then framing the rest of the shelving from the attached beams. Use your level and rafter square to make sure all parts of the frame (beams, crosspieces, legs) are aligned properly and form clean right angles. I would recommend adding bolting the legs (vertical supports) to the beams or crosspieces to strengthen the build. If you are building hanging shelves with no vertical supports, then begin by attaching the main beam to the studs on the wall. Use 3” to 4” screws to secure the 2×4 beam to the wall studs. After secured, cut the other beams and crosspieces to size and screw them together to complete the framing. Crosspieces should be installed between 12” to 16” apart. Shelves lacking vertical supports also need angled supports for reinforcement (reference top picture). These can be installed every few feet, and attached to the wall studs. At the corners of the framing, it is also recommended to add additional supports cut at a 45-degree angle (reference bottom picture). Worth mentioning: I’ve done shelf-building solo. While it is possible, this step is where having some help makes all the difference. Especially when attaching the shelves to the wall studs, an extra set of hands makes construction safer and more manageable.
Pro Tip 1: When attaching the main beam to the wall studs, use a single screw to attach somewhere in the middle of the beam. Check to make sure the beam is level before attaching with additional screws. Also, most wall studs are spaced 16” O.C.
Pro Tip 2: Using a framing nail gun can speed up the construction process. If you have this tool, then the crosspieces can be nailed instead of screwed. I would NOT use nails to attach the beams to the wall studs, or at the corners of the framing. These areas need the 3”-4” screws.
Step 4: Add The Shelf Surface
Cut plywood or OSB to size and attach it to the top of the frame using screws, at minimum 1½” length. A chalk line is a helpful tool for marking plywood. If you have a framing nail gun, then you can use this instead to speed up the process. The plywood or OSB forms the flat surface of your shelves. On my garage shelves, I cut the plywood 2” wider than the width of the framing, to have a slight overhang. I did this so that any slight bows in the framing beams wouldn’t stand out as much. Place screws (or nails) in the plywood every 6”. Please note that in the materials list above, the thickness of the plywood is 23/32”. It is common for plywood or OSB to have a thickness of 7/16” or ½”, however it is recommended to use the 23/32” material for shelving. The 23/32” compared to the smaller sizes is less likely to sag and can support more weight.
Step 5: Sand & Paint The Shelf (optional)

If desired, shelves can be painted to look more appealing. First, sand all surfaces by hand, or with an orbital sander if you have one. Start with 80-grit sandpaper and finish with 120 or 150-grit. Clean off the saw dust before applying paint/primer. Next, apply primer and paint per the manufacturer’s instructions. Certain products combine primer and paint in one, which can save you some time. The wood will soak up the paint on the first coat, especially the plywood, so you may need to apply 2 or 3 coats to get a clean and uniform look. A roller will usually be faster than a brush when applying paint and primer. A 4” roller is recommended for this approach, as it’s well-suited to the dimensions of 2×4 framing.
Final Tips
- Organize shelves based on usage of tools/items. Items that are not needed frequently can go on the top shelves, while things that are needed more often can be placed at “eye-level” for easy access.
- Storage bins are a game-changer for two reasons. One—they let you keep like items together, which makes staying organized a breeze. Two—they just look better than a bunch of random stuff sitting on your shelves. Use a label maker to tag each bin so you can find what you need fast. Want an even cleaner vibe? Stick with one style of bin to give everything a tidy, uniform look.
- Store heavier items lower for safety. Even though 2×4 shelving can be very sturdy if constructed correctly, there is still a weight limit. Keep these heavy items on the bottom shelves or stored under the shelves on the ground.
- Consider adding hooks or a pegboard above or alongside the shelves for tools.
Conclusion
Building shelves in your garage or shed is a rewarding weekend project that pays off immediately in terms of space and organization. Whether you’re tidying up or creating a full-blown workshop, custom shelving is the backbone of a functional garage. By customizing it yourself, the possibilities are endless. If you are having trouble coming up with a design, there are hundreds of pictures online of projects from other DIYers. You can also reach out to us with any questions, and we will be more than happy to help. Now, go get it done!

